

Wearing sandals and flaunting shiny, adorable toes is something that just makes you feel so refreshed. But you don’t have to spend money at the salon in order to get that spa-refined, just-from-the-spa appearance. With prior planning, proper tools, and a little bit of self-deprivation, you can turn your living room into a personal paradise and give yourself a pedicure worthy of the professionals. Home pedicure is not merely a money-spender it’s an opportunity to relax, indulge yourself in a spritz of glamour in your own private ambiance, and pamper your toes to some much-needed indulgences.
The best thing about a home pedicure is the flexibility element. Whether you feel like an immediate fix or the all-day spa treatment, the therapy can be scheduled to fit your mood, your agenda, and your state of mind. From dipping the toes in a scented hot footbath to dusting them with a sprinkle of sheer color, each step of the way is an opportunity to spoil and enjoy an excuse for self-indulgence. And you get to control it all, from atmosphere to polish color, so that it’s highly personalized ritual.
This five-step process is going to walk you through making the high-end pedicure at home. We’re going to walk you through it, from supply shopping all the way to top coating polish with a finish that’s super gloss, so your feet are going to look and feel incredible. So grab a warm blanket, fuel up the top playlist, and we will start with steps one through five to get you well on your way to gorgeous toes.

1. Preparing Your Tools
Prior to actually doing your pedicure, it is well worth your time to prepare to win by having all of the equipment which you will use at your disposal. A quality pedicure kit is the start of a speedy, hassle-free process. You will need to have a nail clipper, nail file, buffer, cuticle pusher, and foot file or pumice stone ready. You will require a foot bath or foot soak, and a foot soak basin to bathe your feet in, and towels to dry them off on. And then of course you have your top coat, base coat, and polish to finish the job.
Keeping all of your needs within reach prevents you from losing the calmness you’re so diligently creating by having to get up for a pedicure to locate a misplaced tool. Improve on it by adding some spa-like amenities. Light an aromatherapeutic candle, add drops of lavender or eucalyptus essential oil to your soak, and listen to soothing music.
Here’s a quick checklist to ensure you’re fully prepared:
- Necessity Tools : File, buffer, cuticle pusher, pumice stone or foot file, nail clipper.
- Soaking Materials : Foot soak or Epsom salts, warm water, basin, essential oils.
- Polish Basics : Top coat, nail polish, base coat, and cotton pads to clean up.
- Ambience Enhancers : Soft towels, relaxing music, plush robe, or candles.
These small additions can transform your setup into a mini retreat, making your pedicure feel like a treat rather than a chore.By setting up your space thoughtfully, you’re not just preparing for a pedicure you’re creating a moment of self-care that feels indulgent and intentional.

2. Remove Old Nail Polish
Your beginning to your pedicure is beginning again from scratch by taking off any current polish. An acetone-free nail polish remover is preferable since it’s gentler on your cuticles and nails without drying or irritating them. Wet a pad of cotton with remover and rub across each nail gently to eliminate all the existing old polish. This is the most important step in order to have a smooth, even surface to apply your new polish to.
For hard polish dark reds or deep colors that cling to your nails place it in the remover for a few seconds and then pull it off. That little tip saves time and prevents hard scrubbing from being too rough on your nails. When soling off of a dark color, also file off the edges of your nails for remaining pigment to have your nails squeaky clean and prepared for the next step.
In order to make all of that process even simpler, below are some tips:
- Select Quality Remover : Select a non-acetone remover with moisturizing ingredients such as vitamin E.
- New Cotton Pads : Use new pads when needed not to smudge existing polish.
- Glitter Friendly : For glitter polish removal, use a foil wrap technique to gently break down.
Proceed with this step cautiously so that your nails are as good a condition as possible to be pampered to come, laying the groundwork for a pain-free pedicure.
3. Soak Your Feet
It’s time to give your feet a spa soak to soften and loosen your skin. Soak a foot bath in warm, not hot, water and a few drops of your favorite scent, lavender to relax or peppermint if that’s your choice. Add a few Epsom salts or pro foot soak if you’re going for the whole shebang that loosens tight tucks and prepares your feet for exfoliating.
Soak feet 10–15 minutes, allowing warm water and fragrance boosters to work their magic. It’s not merely about conditioning your skin; it’s a moment to sit, inhale, and observe day stress dissolve. Keep handy a light, soft towel to pat your feet dry afterward, maintaining that spa vibe.
These are things to do to take your foot soak to the next level of pampering:
- Make It Personal : Add milk, honey, or oatmeal for extra moisturizing.
- Set the Mood : Gentle music or soft light to keep relaxing.
- Watch the Heat : Heat water enough so as not to burn.
This relaxing routine not only softens your feet for what’s ahead, but provides you with some time alone, as well, so it’s best of your in-home pedicure.
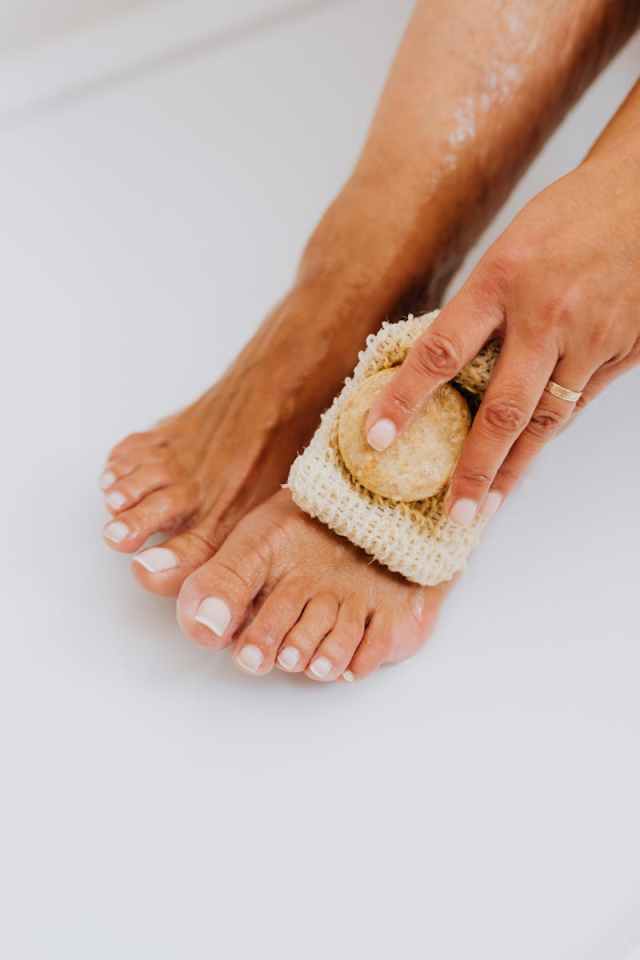
4. Exfoliate and Smooth
With wet feet, now glide over bumpy areas to have smooth, silky feet. Grab a foot scrub or pumice stone and, with it, scrub off dead skin, doing it on such heat spots as the back of your heel and your foot soles, which will dry up and crack. This is a big step towards shiny, professional look and feel since it washes off the dirt that makes your feet appear so tired.
Or, go high-end and make your own homemade foot scrub with easy ingredients such as sugar, olive oil, and a splash of essential oil to give it your own style. Scrub in a circular motion, letting it buff away dead skin and soak up circulation. Soak in warm water, then top it off with a foot file to smooth out the hard patches, leaving your feet silky smooth as a cloud and refreshed.
Use the following best exfoliation practices:
- Homemade Scrub Recipe : Mix ½ cup sugar, ¼ cup olive oil, and 5 drops lavender oil.
- Gentle Pressure : Don’t scrub hard to prevent irritation.
- Target Key Areas : Exfoliate heels, toes, and all calloused areas for maximum effect.
Exfoliating not only makes your feet appear fantastic, but also has the additional benefit of leaving the rest of the pedicure treatment feeling like pure indulgence, so you can proceed immediately to shape and cut your nails.
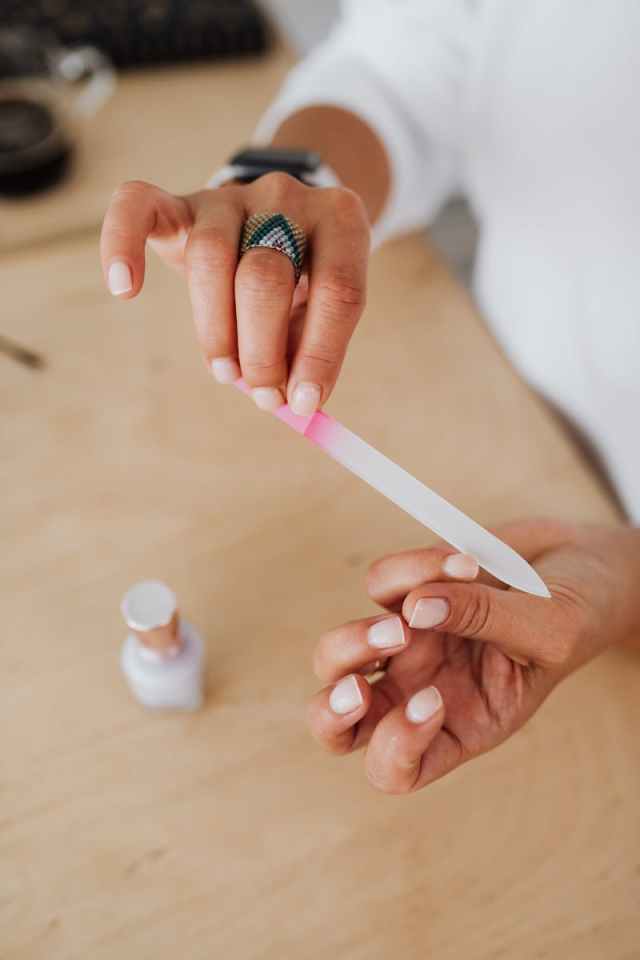
5. Trim and Shape Your Nails
Your toes were soapied around and clipped off at your toes, now scoop out the toenail polish. Clip your nails back to a good length with some good clippers, not too short and sore or ingrowing. Then take out the nail file and curve the edges around into your preferred shape whether you’re doing a square tip classic shape, a rounded soft edge, or something in between.
Second, gently buff the surface of each nail to erase ridges, a clean slate for your polish. Push back excessively long cuticles with a cuticle pusher, but never cut them to avoid infection. It’s a game of finesse, massaging the nails and preparing them for cleanliness before things get exciting the polishing starts.
This is how to have this step down pat:
- Clip Carefully : Clip straight across to steer clear of ingrown nails.
- File in One Direction : Sawing back and forth can weaken nails.
- Keep Cuticles Intact : Push, don’t cut, for healthy nail beds.
Taking the time to perfect your nail shape sets the stage for a professional-looking pedicure that you’ll be proud to show off.

6. Apply Your Base Coat
Finally, your nails are done. Time to create a beautiful polish application base with stain-resistant base coat. This step so many tend to skip is a total game-saver, as it serves as a stain barrier for your natural nails and prevents your polish from getting dingy quicker for a long-lasting look. Choose a well-reviewed base coat that has been designed to strengthen your nails and extend your polish wear life.
Apply a thin, even layer of paint onto each nail, circling the entire surface but avoiding the cuticles. Pressure is where this is all about here don’t do it too fast, though, for quick, good smooth, streak-free results. Firstly, make sure that your base coat is fully dry, though, since this is a good foundation upon which chip resistance can be built and which will position your pedicure to look great for days to come.
Advantages of a well-executed base coat include:
- Yellowing Protection : Stops nails from yellowing due to dark colors.
- Better Adhesion : Enables polish to adhere longer for chip-resistant finish.
- Feeding the Nail : Filling products like biotin in healthy base coats.
One simple step is your pedi-perfect pedicure long-term secret.
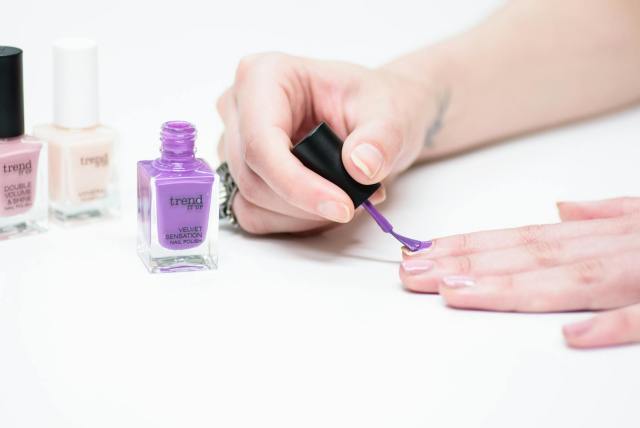
7. Polish Like a Pro
And finally, the best part selecting and applying your polish! With a bright coral, classic nude, or whimsical pastel calling your name, the secret to a flawless finish is the proper application method. Begin with a thin initial coat, applying just enough polish to coat the nail but not so much as to clog the brush. This avoids streaks and offers uniform coverage.
When the first layer dries, coat again for extra color and full coverage. Don’t forget to paint the exposed edge of the nail with a light application of polish at the tip this little tip prevents chipping of the nail. Home crafters, add a nail art element in the way of a glitter accent nail or a simple geometric shape as your own personal touch.
Polish tricks to take your game to the next level:
- Thin Layers : Thin layers in small amounts are faster and easier.
- Clean Up Mistakes : A remover and tiny brush will fix cleanly edges that were laid down on wrong.
- Experiment with Trends : Ombre, metallic, or other trendy techniques are easy to do.
Do it slowly and patiently to be left with a professional, high-end finish that will have everyone looking at your toes from the back.

8. Seal the Deal with a Top Coat
After all the effort you’ve put into your polish, locking it in with a top coat is a must. A quality top coat adds a glossy or matte finish (your choice!) while acting as a shield against chips, scratches, and everyday wear. It’s the final touch that takes your pedicure from good to great, ensuring it stays vibrant for as long as possible.
Put on a generous layer of top coat, spreading it over the whole nail and tipping over the cuticles to seal in your color. Busy individuals save time without sacrifice of shine and wear with a quick-drying top coat. Allow it to dry fully don’t rush into shoes too quickly to prevent smudges or dents in your flawless finish.
Why a top coat is necessary:
- Longer Lasting Polish : Adds days to pedicure life.
- Matte or Glossy Finish : Choose a finish that’s nice to the touch.
- Wear Protection : Protects nails from daily wear and tear like walking or washing.
This is the sundae cherry on top of your pedicure that will make your toes anything but perfectly imperfect.

9. Moisturize and Massage
Your nails are done but your feet aren’t going to ruin themselves either those need to be addressed too. Apply a rich foot cream or balm filled with moisturizers such as shea butter, coconut oil, or aloe vera to provide your skin with a silky and smooth texture. Massage the cream on all of your feet, particularly dry areas such as heels and cuticles, to seal in moisture and get that spa-like glow.
The soft foot massage on this area writes magic on your mood and feet. Massage in a circular motion using your thumbs, from the tips of the toes to ankles to allow the flow and relax the tension. To provide that little indulgence, warm up your lotion ahead of time before using its silky smooth texture that feels like being at the spa.
Silk-footed foot moisturizing tips:
- Select a Nice Formula : Select vitamins or natural oils for lotions.
- Soother Massage Therapy : Take 2–3 minutes for each foot to benefit the most.
- Apply Daily : Moisturize in between pedicures so your feet stay soft for as long as possible.
The last step turns your pedicure into a spa experience in every sense, and you’re refreshed and ready to conquer the world.
Final Thoughts:
With these nine steps, you’ve transformed a basic pedicure into an at-home pampering self-indulgence on equal terms with anything you’d get in a salon. From soaking your toes in scented bath to buffing on your shine with mirror-top coat, each step is an opportunity to relax, indulge yourself, and bring some glamour into your life. The glamour angle? You can do it all this way, whenever you want, in your own home.
Your toes are sparkling ready, whether you’re slipping on flip-flops or cuddly socks. You haven’t merely saved a buck by spending a little effort and time but have also created a customized experience that’s all about you. So go on and ogle those lovely toes you’ve earned every moment of this luxury.
For a bit more inspiration, read the following supporting articles:
- Home Gel Nail Kits of 2024 : Get the best on for an amateur-free at-home manicure.
- The ‘Quiet Luxury’ Manicure Movement : Peek at understated, high-style nail art for timeless chic.
- Home Gel Nail Kits, Tested and Reviewed : Get top-rated kits to elevate your nail game.
Cheers to more beauty-full, relaxation-full, and self-care-full moments your toes will thank you!


